The Core VyOS Router - Revisit
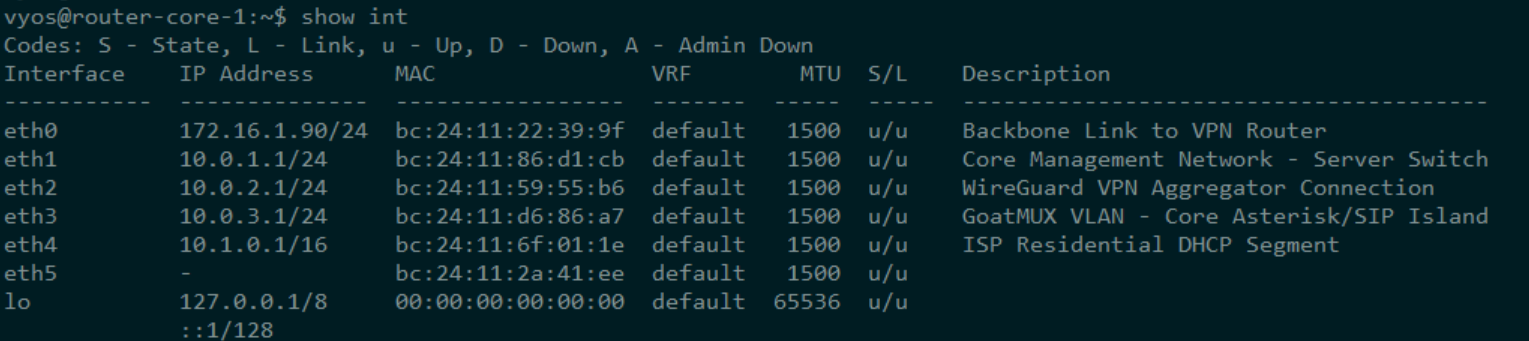
In this build, VyOS is the spine. It routes, it NATs, it tags traffic, and it acts as the handoff point between every virtual service and every simulated user in the lab. This isn't just a router—it’s the control point where infrastructure becomes programmable. For the CodexMCP stack, VyOS provides deterministic packet flow, VLAN separation, DHCP relay paths, and NAT policy enforcement, all under versioned, auditable config. In this post, we’ll revisit the full live config running in the lab and break it down line by line. Every setting is here for a reason. Nothing is cargo cult. Let’s begin.
Right now we are working with a very basic config and no VLANs. As we move forward with this project VLANs and many other configs will come in to use, but we are starting at bare bones and working up, which I think is the best way to learn.

eth0 The WAN Uplink
set interfaces ethernet eth0 address 'dhcp'
set interfaces ethernet eth0 description 'Backbone Link to VPN Router'
set interfaces ethernet eth0 hw-id 'bc:24:11:22:39:9f'
set interfaces ethernet eth0 offload gro
set interfaces ethernet eth0 offload gso
set interfaces ethernet eth0 offload sg
set interfaces ethernet eth0 offload tso
This is the upstream lifeline—the interface connecting VyOS to the external world (or at least to the upstream VPN router representing it). It pulls its IP via DHCP, which is fine in a lab context where addressing isn’t carved in stone and DHCP from the upstream device is stable.
The hardware ID is explicitly pinned with hw-id. This makes VyOS configs portable and deterministic even if NIC ordering changes during boot or hardware swaps—especially handy in Proxmox or when dealing with virtualized NICs.
Then we get into the offload settings:
- GRO (Generic Receive Offload)
- GSO (Generic Segmentation Offload)
- SG (Scatter-Gather)
- TSO (TCP Segmentation Offload)
These are all performance-related flags that push some packet processing down to the NIC or virtual NIC layer. In a virtual lab scenario, especially one simulating thousands of sessions and leases, you want to squeeze every bit of efficiency you can. These settings reduce CPU overhead during heavy traffic, particularly when testing NAT throughput, logging, or pushing data into the log watchers.
In our setup, this connects back to the main home network through proxmox bridge vbr0, which is still one hop off the Internet.
eth1 Core Management Network
set interfaces ethernet eth1 address '10.0.1.1/24'
set interfaces ethernet eth1 description 'Core Management Network - Server Switch'
set interfaces ethernet eth1 hw-id 'bc:24:11:86:d1:cb'
This interface is the heart of the internal control plane. It’s where all the real work happens—not for customers, but for the machinery running the ISP itself.
eth1 is statically addressed at 10.0.1.1/24, forming the anchor point of the Core Management Network. It’s directly tied into a Proxmox bridge named core_mgt, which acts as a virtual switch interconnecting all ISP-critical hosts: DNS, DHCP, SIP, mail, metrics collectors, log ingestors, you name it. Every VM and container that serves a control function lives here.
The /24 subnet keeps things clean and scoped. It’s large enough to host dozens of services but small enough to spot anomalies fast. No DHCP is used here—every service has a known IP, and the VyOS router (10.0.1.1) is their default gateway.
Once again, the hardware ID is explicitly set to guarantee that interface ordering stays consistent, even across reboots, kernel updates, or NIC renumbering in Proxmox.
This is the trusted zone. It’s not customer-facing. It's not bridged into simulation churn or NAT workloads. It’s the path over which CodexMCP will speak to every backend system, push configs, scrape metrics, and observe the entire environment. If eth0 is your WAN artery, eth1 is your spine.
eth2 VPN Aggregator
set interfaces ethernet eth2 address '10.0.2.1/24'
set interfaces ethernet eth2 description 'WireGuard VPN Aggregator Connection'
set interfaces ethernet eth2 hw-id 'bc:24:11:59:55:b6'
This interface, eth2, is dedicated to one job: acting as the physical endpoint for incoming and outgoing WireGuard tunnels. It’s where remote sites, virtual nodes, or partner labs connect back into the core via encrypted links.
The interface is statically assigned 10.0.2.1/24, forming the gateway for any peers that are funneled into this segment. Think of this like a dedicated landing zone for encrypted transit—separate from both the WAN and management networks to ensure clean segmentation of traffic types.
By isolating WireGuard traffic here, you avoid routing ambiguities, simplify firewall rules, and can easily monitor or throttle tunnel traffic without affecting internal service comms or public-facing NAT.
Like all other interfaces in this config, the hw-id is locked in to maintain consistency in virtual NIC ordering, which is especially important when multiple interfaces are being juggled in Proxmox or when dealing with cloud-init or automation that doesn’t guarantee deterministic device naming.
This setup assumes that the WireGuard tunnels themselves are defined separately (in the interfaces wireguard section), but they will all bind through this interface’s IP and route through this zone.
In short: eth2 is the encrypted on-ramp. Every secured pipe in and out of the lab rides through here.
eth3 SIP Island
set interfaces ethernet eth3 address '10.0.3.1/24'
set interfaces ethernet eth3 description 'GoatMUX VLAN - Core Asterisk/SIP Island'
set interfaces ethernet eth3 hw-id 'bc:24:11:d6:86:a7'
This interface, eth3, is the launchpad for everything SIP. It forms a dedicated, tightly scoped network segment used exclusively for voice routing, call control, and SIP session orchestration. This is where GoatMUX, Kamailio, and Asterisk come together to build a virtual Class 5 switch that doesn’t suck.
We assign it a static address—10.0.3.1/24—and hang every SIP-critical component off it: Kamailio as the SIP load balancer and registrar, Asterisk as the media anchor and dialplan executor, and any other SIP-aware services like voicemail backends or RTP relays. All traffic between these services happens inside this VLAN, off the public internet, off the management bus, and away from any simulation noise.
The purpose of isolating SIP here is control, predictability, and performance:
- Control: GoatMUX manages routing, load awareness, and state tracking across multiple SIP subsystems. By keeping traffic on this island, it gets full visibility and deterministic call paths.
- Predictability: SIP is fragile by nature. Even slight jitter or a misclassified NAT flow can break registration or one-way audio. Here, latency and topology are stable.
- Performance: Asterisk and Kamailio can pass signaling and RTP with minimal hops and zero firewall interference.
This isn’t just a LAN—it’s a SIP execution zone. Kamailio will typically bind here on port 5060/UDP and 5061/TCP for TLS, and route calls between internal peers (Asterisk boxes) and external users (via GoatMUX and NAT). Later, when we tie this into NAT or WireGuard exposure points, this interface gives us a clean hook to apply security policies, session filters, and visibility tools like GoatWatch or FerroSearch trace injection.
As with the others, hw-id is pinned for reliability in VM restarts or if the host platform changes. Consistency is king.
Bottom line: eth3 is not just another port—it’s the GoatMUX brainstem. All SIP intelligence and orchestration originate here.
eth4 The ISP Residential DHCP Segment (Where We Are Now)
set interfaces ethernet eth4 address '10.1.0.1/16'
set interfaces ethernet eth4 description 'ISP Residential DHCP Segment'
set interfaces ethernet eth4 hw-id 'bc:24:11:6f:01:1e'
This is where the rubber meets the road. eth4 is the front line between the ISP core and the simulated end users. It represents the access layer—the segment where customer CPEs, modems, or virtual clients connect, pull DHCP leases, and begin their digital lives.
The interface is configured with a massive /16 subnet (10.1.0.1/16), giving us over 65,000 usable IPs. Why? Because we're stress-testing at scale. This isn't a polite little lab with five devices—we're modeling thousands of simulated users requesting leases, renewing, expiring, and generating real churn and log volume.
This subnet is used exclusively for residential DHCP clients in the testbed. It's fed by Kea DHCP running as a service on the Core Management Network, which is already handing out leases to thousands of simulated clients via perfdhcp and soon, more intelligent user agents written in Go.
The hardware ID is fixed, as with all other interfaces, to keep NIC order stable even across VM migrations or host reboots.
This is the current frontline of the project. Right now, the lab is focused on validating whether a virtual user can:
- Obtain a lease
- Communicate through NAT
- Reach authentication services (like RADIUS or captive portals)
- Begin generating usable, observable session data
Before we move on to services—mail, SIP, IPTV, cloud sync—we need this layer to be solid. We need confidence that users can connect, identify themselves, and begin interacting with the stack.
This segment, eth4, is more than just a simulated access point. It's the cradle of the user experience. Everything we build from here—voice, video, metrics, compliance—will hang off the assumption that this part just works.
NAT Configuration – Outbound Masquerade for Internal Traffic
set nat destination
set nat source rule 10 description 'NAT for internal network'
set nat source rule 10 outbound-interface name 'eth0'
set nat source rule 10 source address '10.0.0.0/8'
set nat source rule 10 translation address 'masquerade'
This section enables source NAT (SNAT), more specifically masquerading, for all traffic originating from internal lab networks when they exit through eth0, the WAN-facing uplink.
Here’s what each line does:
set nat destination
This line initializes the destination NAT section, but since no rules are defined under it here, it’s just a placeholder. It's harmless unless you start mapping inbound ports.set nat source rule 10 description 'NAT for internal network'
Gives the rule a human-readable tag for reference. Rule 10 is a classic SNAT rule.set nat source rule 10 outbound-interface name 'eth0'
This defines the egress interface—any traffic leaving througheth0is a candidate for NAT.set nat source rule 10 source address '10.0.0.0/8'
Limits NAT application to any internal traffic with a source IP in the private10.0.0.0/8block. This includes your10.0.1.0/24(core_mgt),10.0.2.0/24(WireGuard),10.0.3.0/24(GoatMUX/SIP), and10.1.0.0/16(DHCP/user edge).set nat source rule 10 translation address 'masquerade'
This tells VyOS to dynamically SNAT each outbound connection using the current IP assigned toeth0. It’s essentially saying, “rewrite the source IP to whatevereth0has.”
Why this matters:
This is what makes the lab behave like a real ISP core. Internal devices—whether they’re services, simulated users, or SIP endpoints—can reach out to the internet (or upstream VPN-connected resources) using a single public-facing IP on eth0. From the outside, all internal traffic appears to come from that one IP.
It also ensures things like package updates, remote repo pulls, and API calls from GoatMUX or CodexMCP will just work without special routing or source IP declarations.
In a production ISP, this same model would be used for CGNAT. Here, it’s basic masquerading, but the logging and observability side (via GoatWatch and FerroSearch) will later extend this into full forensic NAT mapping.
Bottom line: this block lets your entire lab talk out—without leaking real internal IPs—and sets the stage for NAT event logging, CGNAT simulation, and session visibility.
Static Routes – Defining External Reach and Internal Exceptions
set protocols static route 0.0.0.0/0 next-hop 172.16.1.1
set protocols static route 10.0.1.192/28 next-hop 10.0.1.140
set protocols static route 10.0.1.194/32 next-hop 10.0.1.193
set protocols static route 10.0.2.0/24 next-hop 10.0.2.2
set protocols static route 172.16.1.0/24 next-hop 172.16.1.1
These static routes form the backbone of custom traffic steering in the lab. While dynamic routing protocols (like OSPF or BGP) are great for large-scale, multi-node networks, static routes offer full control and predictability, ideal for a lab where you're juggling simulated users, virtual tunnels, and one-off test endpoints.
Let’s walk through each one:
set protocols static route 0.0.0.0/0 next-hop 172.16.1.1
This is the default route—any traffic with no more specific destination goes here. It tells VyOS to send all unknown outbound traffic to the upstream gateway at 172.16.1.1.
This is your path to the “internet,” or more precisely, whatever is upstream from this box in your VPN-connected or simulated WAN setup.
set protocols static route 10.0.1.192/28 next-hop 10.0.1.140
This defines a specific route for a /28 subnet carved out of the core management network (10.0.1.0/24).
Why would you do this? Likely for isolation or handoff to a specialized VM or virtual appliance that owns or simulates a discrete IP block within the core. Maybe it’s a testing VLAN, or a containerized service cluster that's network-segmented but reachable via a bridge.
set protocols static route 10.0.1.194/32 next-hop 10.0.1.193
This is a host route—pointing specifically at one IP (10.0.1.194), routed via a neighbor at 10.0.1.193.
Host routes like this are surgical. You’re saying “this one machine—maybe a test harness, logging box, or simulated external user—should be accessed via a nonstandard gateway.” It’s useful for isolating return traffic or simulating asymmetric routing conditions.
set protocols static route 10.0.2.0/24 next-hop 10.0.2.2
This routes all traffic destined for the WireGuard network (10.0.2.0/24) through a peer on 10.0.2.2. This likely means another device on that subnet is serving as a concentrator, NAT gateway, or encryption endpoint for tunneled connections.
Maybe you've got multiple VPN routes and want this one to steer into a specific lab VM or testbed via an intermediate hop. This gives you that control.
set protocols static route 172.16.1.0/24 next-hop 172.16.1.1
Explicitly routes the full 172.16.1.0/24 subnet to the same next hop as your default route. This exists as a safety net or override in case other route definitions would interfere with proper handling of this subnet, perhaps because it overlaps with nested simulations, VXLANs, or NAT-translated IPs.
Why These Matter
These static routes give you:
- Precise traffic engineering across internal test networks
- Control over pathing, which is critical when modeling different edge cases
- The ability to test asymmetry, simulate multi-gateway behavior, or deliberately isolate return paths
- Security segmentation, so services with different roles or access levels don't get flattened into a default route
This is exactly the kind of routing logic an ISP has to wrestle with every day, just abstracted up to BGP scale. In the lab, you do it manually, so when something breaks, you know why.
Title: Base System Configuration – Identity, Access, and Admin Controls
set service snmp community public authorization 'ro'
set service ssh listen-address '172.16.1.90'
set system config-management commit-revisions '100'
set system console device ttyS0 speed '115200'
set system host-name 'router-core-1'
set system login user vyos authentication encrypted-password
This section covers basic but essential router configuration—system identity, access controls, and operational hygiene. Even though this block is pretty standard across all VyOS routers in the lab, it still matters, especially in environments where infrastructure is tightly versioned and controlled by automation.
set service snmp community public authorization 'ro'
This enables SNMP read-only access using the community string public. It’s the standard starting point for pulling basic metrics from the router—interface stats, CPU load, memory usage, etc.—which can then be fed into tools like LibreNMS, Observium, or your own GoatWatch hooks.
Yes, public is a bad default for production, but in a private, isolated lab where you’re just setting up visibility, it’s fine. (Later stages should rotate this to a unique community per site or service class.)
set service ssh listen-address '172.16.1.90'
Limits SSH access to a single address: 172.16.1.90. That’s probably your admin workstation, your Proxmox bridge, or your jump host. Either way, this is how you enforce access discipline—no wildcard listening, no wide-open attack surface.
This means only that IP can SSH into the router, adding a basic layer of physical network filtering on top of any password auth or key exchange.
set system config-management commit-revisions '100'
VyOS supports a revision-based config history system, kind of like local Git for router state. This line sets the system to retain the last 100 committed configurations.
You’ll thank yourself for this later when you want to roll back three commits and realize the system has full knowledge of past states.
set system console device ttyS0 speed '115200'
This configures the serial console (typically for out-of-band access via IPMI, KVM, or a serial terminal server) to run at 115200 baud on /dev/ttyS0. This is standard across most hardware platforms and VMs.
If the box ever bricks its network interfaces or you're working headless, this is your emergency escape hatch.
set system host-name 'router-core-1'
Sets the hostname—straightforward, but critical when you’re running multiple routers or pushing logs to GoatWatch, where hostname becomes a unique identifier. Consistency here matters for sorting, alerting, and correlating events.
set system login user vyos authentication encrypted-password
This creates or updates the vyos user and sets their password—but you don’t see the actual encrypted hash here. Normally, this line ends with a SHA512-crypt or similar hash string like:
$6$rounds=5000$AbCdEfGh...$longer
This protects the real password from being stored in plaintext. The hash is generated using the set CLI or by editing the config manually with load or edit, then committing.
You never want to paste the hash directly into shared config unless you're recreating an image or provisioning automatically. In production, you'd rotate these using automation tools like Ansible, Salt, or VyOS’s own config scripts.
These settings define who this router is, who can touch it, and how it keeps track of itself. They’re foundational. And while they’re mostly boilerplate, they still deserve to be locked down, documented, and versioned like everything else—because every battle starts with a misconfigured default.
This block may not route packets, but it determines whether you can log in to fix them when they don’t.
Centralized Logging – Custom Syslog Host for Unified Observability
set system syslog global facility all level 'info'
set system syslog global facility local7 level 'debug'
set system syslog host 10.0.1.100 facility all level 'info'
This block defines the logging behavior for the router—and by extension, the observability layer of the entire stack. It pushes structured syslog data to a central log collector that lives at 10.0.1.100. That IP resides on the Core Management Network (eth1), meaning all logs stay within the trusted services segment.
Let’s break it down:
set system syslog global facility all level 'info'
This sets the default syslog verbosity for all facilities—kernel, daemon, userland, etc.—to info. That level captures most operational messages without descending into raw debug noise. It includes route flaps, interface changes, SNMP activity, NAT rule hits, and more.
set system syslog global facility local7 level 'debug'
This overrides the above rule for local7, enabling deeper debug output for anything you explicitly configure to log there (custom daemons, test hooks, or embedded logging within GoatMUX or CodexMCP agents).
Local facilities like local0 through local7 are the syslog equivalent of wildcard lanes—they’re whatever you want them to be. In your case, local7 might later be used for metric shippers, experimental NAT logs, or alerting triggers during forensic event replay.
set system syslog host 10.0.1.100 facility all level 'info'
This pushes all messages at info level or higher to a central syslog receiver on 10.0.1.100. In this lab, that’s a single VM—most likely a GoatWatch logging box running rsyslog, syslog-ng, or even a custom log ingestor feeding FerroSearch or OpenSearch.
Why This Matters
This logging setup is consistent across every VM and router in the stack. It creates a unified stream of observability without relying on pulling or scraping logs individually.
In a production-grade deployment, that IP (10.0.1.100) would not point directly to a single host. Instead, it would point to a load balancer (HAProxy, NGINX, or LVS) that fans logs out to two or more redundant receivers—ensuring no single logger becomes a point of failure or performance bottleneck.
But for now, in the lab, one target is enough. It's fast, local, and auditable. Every box in the simulation writes its heartbeat to the same place. That means faster debugging, easier forensics, and a solid foundation for building real-time metrics, alerts, and post-mortem reporting.
This config isn’t just about compliance logging—it’s about operational truth. And truth starts at layer 0: the logs.
Entire Config
Below is the entire config for what we just explained above. We did not dig deep into the ntp allow section because those are dependant on your network.
set interfaces ethernet eth0 address 'dhcp'
set interfaces ethernet eth0 description 'Backbone Link to VPN Router'
set interfaces ethernet eth0 hw-id 'bc:24:11:22:39:9f'
set interfaces ethernet eth0 offload gro
set interfaces ethernet eth0 offload gso
set interfaces ethernet eth0 offload sg
set interfaces ethernet eth0 offload tso
set interfaces ethernet eth1 address '10.0.1.1/24'
set interfaces ethernet eth1 description 'Core Management Network - Server Switch'
set interfaces ethernet eth1 hw-id 'bc:24:11:86:d1:cb'
set interfaces ethernet eth2 address '10.0.2.1/24'
set interfaces ethernet eth2 description 'WireGuard VPN Aggregator Connection'
set interfaces ethernet eth2 hw-id 'bc:24:11:59:55:b6'
set interfaces ethernet eth3 address '10.0.3.1/24'
set interfaces ethernet eth3 description 'GoatMUX VLAN - Core Asterisk/SIP Island'
set interfaces ethernet eth3 hw-id 'bc:24:11:d6:86:a7'
set interfaces ethernet eth4 address '10.1.0.1/16'
set interfaces ethernet eth4 description 'ISP Residential DHCP Segment'
set interfaces ethernet eth4 hw-id 'bc:24:11:6f:01:1e'
set interfaces ethernet eth5 hw-id 'bc:24:11:2a:41:ee'
set interfaces loopback lo
set nat destination
set nat source rule 10 description 'NAT for internal network'
set nat source rule 10 outbound-interface name 'eth0'
set nat source rule 10 source address '10.0.0.0/8'
set nat source rule 10 translation address 'masquerade'
set protocols static route 0.0.0.0/0 next-hop 172.16.1.1
set protocols static route 10.0.1.192/28 next-hop 10.0.1.140
set protocols static route 10.0.1.194/32 next-hop 10.0.1.193
set protocols static route 10.0.2.0/24 next-hop 10.0.2.2
set protocols static route 172.16.1.0/24 next-hop 172.16.1.1
set service https api keys id codexmcp key 'mysecureapikey123'
set service https api rest
set service lldp interface all
set service ntp allow-client address '127.0.0.0/8'
set service ntp allow-client address '169.254.0.0/16'
set service ntp allow-client address '10.0.0.0/8'
set service ntp allow-client address '172.16.0.0/12'
set service ntp allow-client address '192.168.0.0/16'
set service ntp allow-client address '::1/128'
set service ntp allow-client address 'fe80::/10'
set service ntp allow-client address 'fc00::/7'
set service ntp server time1.vyos.net
set service ntp server time2.vyos.net
set service ntp server time3.vyos.net
set service snmp community public authorization 'ro'
set service ssh listen-address '172.16.1.90'
set system config-management commit-revisions '100'
set system console device ttyS0 speed '115200'
set system host-name 'router-core-1'
set system login user vyos authentication encrypted-password '$6$rounds=we78rudj9w0e7r90j9034$i3490j50980e9r890sd809u47059670923890209378904uieu$jk0239ui40uj0j23094i$8se098ui09uf09j09j34$4-089woijhf098g'
set system login user vyos authentication plaintext-password ''
set system syslog global facility all level 'info'
set system syslog global facility local7 level 'debug'
set system syslog host 10.0.1.100 facility all level 'info'
The Backbone of a Virtual ISP
What you’ve just read is the full current VyOS configuration that underpins the routing and segmentation of this entire project stack. It’s the live, running config—nothing redacted, nothing theoretical. This is what’s directing packets, segmenting services, enforcing NAT, and tying all the core components of CodexMCP, GoatMUX, GoatWatch, and the simulated user edge together.
Will it evolve? Absolutely. As services come online, as GoatMUX starts pushing SIP traffic through Kamailio, as GoatWatch grows into a full-blown observability mesh, and as virtual users start behaving like real subscribers—this config will shift to support it. Routes will be added. Policies refined. Maybe BGP enters the chat. Maybe VRRP comes into play for HA.
But this is the foundation. This is the routing layer that lets the rest of the lab breathe.
From here forward, everything else builds on top—authentication, DNS, content, voice, metrics, and eventually full forensic logging of every session, lease, and packet class. One interface at a time. One service at a time.